Saturday, February 26, 2011

Etsy Shop Review: Bungalow Bath and Body

Introducing: Bungalow Bath and Body
Handmade soap in all natural Glycerin, Shea Butter & Goats Milk in a variety of scents and colors, Paraben free Whipped Soaps and Sugar Scrubs, Body Butters, Lip Balms, Perfumes & more on the way!

What I ordered:
1. Cake Batter Whipped Soap, 2oz- $4.25
2. Banana Cream Pie Whipped Sugar Scrub, 2oz- $4.25
3. Pancake Breakfast Whipped Sugar Scrub, 2oz- $4.25
She also included Snickerdoodle Cupcake Body Butter- 2oz.

Customer Service
I was so happy with how I was treated and how friendly the shop owner was. I had asked her about body butters since she only had one in her shop, and in the end she told me she would send me a free sample along with my order. Amazing customer service!

Shipping
She sent all of my items out 1 day after I placed my order and I received them in 3 business days. 

Quality
All I have to say is that I am in love with the all of the products I received, they smell amazing and leave my skin feeling very soft!
My favorite scent would have to be snicker doodle cupcake closely followed pancake breakfast. The snickerdoodle body butter's scent (besides from smelling amazing) also lasts for a long time!

Prices
The total order price was $17 which included shipping, what a great deal!

Packaging
She packaged all of her items in a cardboard box filled with packing peanuts. Inside of that they were all inside of a plastic bag. There was no leakage whatsoever. And on top of the peanuts she had a very sweet handwritten note (see picture)

Overall
I am so happy with my order and look forward to taking a shower each night so I can use the products! The scents are amazing and sometimes I find myself just smelling them because I can't get enough. Her customer service was great, prices were so reasonable, packaging resulted in no spills, and very fast shipping. I highly recommend checking this shop out, you won't regret it!

Thursday, February 24, 2011

Yellow Cake Recipe

I just recently made this cake for a birthday and I have to say (even though I am a bit biased) this cake was fantastic! It does take a little longer than some, with having to separate 8 eggs, but totally worth it. Enjoy!
Ingredients
  • 1 cup butter
  • 1 1/2 cups white sugar
  • 8 egg yolks
  • 3/4 cup milk
  • 1 1/2 teaspoons vanilla extract
  • 2 cups cake flour
  • 2 teaspoons baking powder
  • 1/2 teaspoon salt

Directions

  1. Preheat oven to 350 degrees F (175 degrees C). Grease and flour 2 - 8 inch round pans. Sift together the flour, baking powder and salt. Set aside.
  2. In a large bowl, cream together the butter and sugar until light and fluffy. Beat in the egg yolks one at a time, then stir in the vanilla. Beat in the flour mixture alternately with the milk, mixing just until incorporated. Pour batter into prepared pans.
  3. Bake in the preheated oven for 25 to 30 minutes, or until tops spring back when lightly tapped. Cool 15 minutes before turning out onto cooling racks.

Wednesday, February 23, 2011

Wednesday's Etsy Artisan: Robots are Awesome

I have seen many other blogs do this, and I thought it was a great idea! Each Wednesday I am going to choose a unique etsy artisan and feature them on my blog. Hopefully you will check them out~
I am so excited to introduce you to this week's Etsy Artisan:
Robots are Awesome

This shop sells handmade robots that are so adorable, I can't stop looking at them and its hard to pick which photos of her items to show you :) These robots are so unique and I hadn't seen anything like them before, so I just had to share them with you guys!

Each robot contains a heart which I thought finished them off perfectly. And since every single one is handmade yours will be completely unique. Robots Are Awesome also takes custom orders so you can get exactly what you want! Maybe a special robot for your loved one, or someone's birthday...the list is endless. Here are just a few of the amazing robots in her shop:


I can't wait to see what she comes up with next!


Tuesday, February 22, 2011

Etsy Artisan Features

Check back tomorrow as I post my very first Etsy Artisan Feature! Hopefully I will be able to do one every Wednesday. Tomorrow's feature is a very unique shop and just because I am so excited about this new series I am going to give you a hint about the shop: robots. Although that pretty much gave it away, hopefully you will be back tomorrow to check out the post and her shop. If you want to be featured, leave a comment or send me a message! Thanks for checking out my blog :D

Such Crazy Weather!!

Wow has the weather here been crazy! Just last Friday it was 70 F and everyone was wearing shorts and walking around in flip-flops. Today is was in the 30's and last night we were supposed to get 3-6 inches of snow. But knowing the weathermen and their accuracy, we ended up getting just about 1/4". Still though, going from being in the 70's to dropping all the way to the teens tonight is driving my bod crazy. It also makes it hard to figure out what to wear in the morning :D I hope everyone is having a great day, and that your weather is less crazy than here!

~Creations by Colette

Sugar Cookie Earrings

DAY 5
I feel so happy right now with my fifth posting in a row today. I made these earrings awhile ago, but just no got around to taking pictures of them and posting them! I hope you guys like them.


They are currently listed for $6.50:

Also check out my newest section: From The Heart where today I wrote about the crazy weather we have been having here recently! Thanks for reading :)

Monday, February 21, 2011

Polymer Clay 101: Coming Up with Ideas

I have invented a new word since I have begun making polymer clay jewelry: craft block. It is just like writers block, but in a creativity, jewelry making state. I think it happens to pretty much everyone at some point, and it can be sooo frustrating. So I have a few tips on coming up with some new and fresh ideas! 

  1. Since I love making miniature food jewelry, I just go upstairs to my kitchen and scrounge around until I find something that I feel like taking a whack at sculpting.
  2. Hopefully I am not the only one who does this, but I shop around on etsy (I usually start out looking for ideas but end up in the beauty section or looking at non-polymer clay jewelry). I would never copy someone, but I just look for a basis...like the birthday cake, I had seen a yellow cake with chocolate frosting that had colorful sprinkles on it and thought they would look even better on a slice of white cake!
  3. Look around you. Just as simple as that, just look.
  4. Browse the web for ideas. Sometimes when I just look at simple photographs I get great ideas. Or for me I just search things like "dessert" "treat" "food" "sweet" and so on. Search keywords of stuff that you like to make!
  5. When all else fails, go do something else. Yeah I know, talk about giving up, but if I ever get really stuck I just go and do something else. Chances are the next time I feel like crafting again I have come up with a really awesome idea. Sometimes for me, just taking a quick break really helps me to clear my mind.
Hopefully these tips will help you with your crafting escapades. Happy crafting!!

Cinnamon Roll Earrings

We are going for a record: up to 4 days now! Wooo-hooo! Today, I am listing some more cinnamon roll earrings. I am in love with these earrings, I liked them so much the first time I made them that I had to make 2 pairs this time. One to sell and one for me to wear. I have an earlier post that has a (kinda) description on how to make these cinnamon roll earrings: http://creationsbycolette.blogspot.com/2011/01/ooey-gooey-cinnamon-rolls_19.html
They are currently listed in my etsy shop for $7.00 
I hope you like them and so many thanks for reading my blog!

Sunday, February 20, 2011

Etsy Shop Review: jHenSunshine

This is my first ever shop review so I thought I would start with one of my favorite stores that I have ordered from: 
jHenSunshine


I have already purchased from this shop twice and have had an amazing experience both times. In total I have ordered 7 rings from her. She is one of the sweetest shop owners and even took time to take a picture of one of the rings being worn for me! So sweet!


What I ordered
I have ordered 7 wire rings. These rings are totally adjustable and could fit the smallest to the biggest finger. She has so many color combos it was hard to choose which ones I wanted (that's why I ended up ordering so many) Each ring is made of beads on wire, the ends are made into little swirls and really help to finish off these amazing rings! 

Customer Service
As I have already said she has great customer service. I had started a conversation with her about what the rings look like on your fingers, and she quickly responded and took a picture of the exact ring that I was looking at so I could see what it looked like being worn. She was so friendly during my whole experience and followed up and thanked me, as well as sending a picture of her new addition (who is adorable!).

Shipping
Her shipping was super fast! She sent them out right away and I received them in no time.

Quality
I have worn her rings so many times since I ordered them, and have received to many compliments to count :D You can tell that she spends a lot of time on each ring and that the materials she uses are very high quality.

Prices
In addition to everything else her prices are also very very reasonable. The last purchase I made, which was for 4 rings, came to a total of $18.00 including shipping. Taking into account how many times I have worn them, it was a fabulous deal.

Packaging
Great packaing, they all arrived perfectly and she even added a note (see picture) and an extra ring!!!

Overall
This was one of the first shops I have ordered from and is still one of my favorites. She has something for everyone and at great prices. Shipping price is perfect and her customer service is outstanding. She has simply amazing products at such reasonable prices, check her out right now! I couldn't recommend her shop enough!!!!


Pumpkin Pie Earrings

I am so happy! I have listed an item a day now for 3 days (new record!). Now I know Thanksgiving has passed a while ago, but I sold a pair of pumpkin pie earrings so I thought I would make some more and re-list them, why not? And I always say, it is always time for some Pumpkin Pie. I hope you like them!

They are selling for $6.50 in my etsy store: http://www.etsy.com/shop/CreationsbyColette?ref=hdr.

Please check them out, and thanks so much for looking at my blog!

Saturday, February 19, 2011

Polymer Clay 101: Fun Items to Use with Polymer Clay

Okay so now you have gotten started with polymer clay, and just having clay is getting boring right? Well here are some of my favorite tools and supplies that I use along with my polymer clay:

  1. Chalk Pastels: These are a must when making food! You can use the orange one to give items a cooked look, use the white for powdered sugar, brown for cinnamon and so much more. I picked up a huge set of them at Michaels for only about $6.
  2. Clay Tools: I recently bought a set of clay tools from Michaels. I found it in the row with all of the polymer clay, and now I have no idea what I would do without some of the tools from that set!
  3. Glass Marble Beads: These are great for sprinkles, you can find them in the scrap booking section and they cost $1.99 for 2 tubes of them
  4. TLS: This is basically liquid clay that you can use for so much! It is more expensive than regular clay but has so many uses. For instance: frosting and whipped cream.
  5. Paintbrushes: Use them to put on chalk pastels, apply glaze. Use the ends to make holes or anything else.
  6. Mini Cookie Cutters: I found these in the polymer clay row and they have so many ways to use them.
This is just a few of the items that you can purchase, but these are the things that I use the most.
And just remember, have fun!!

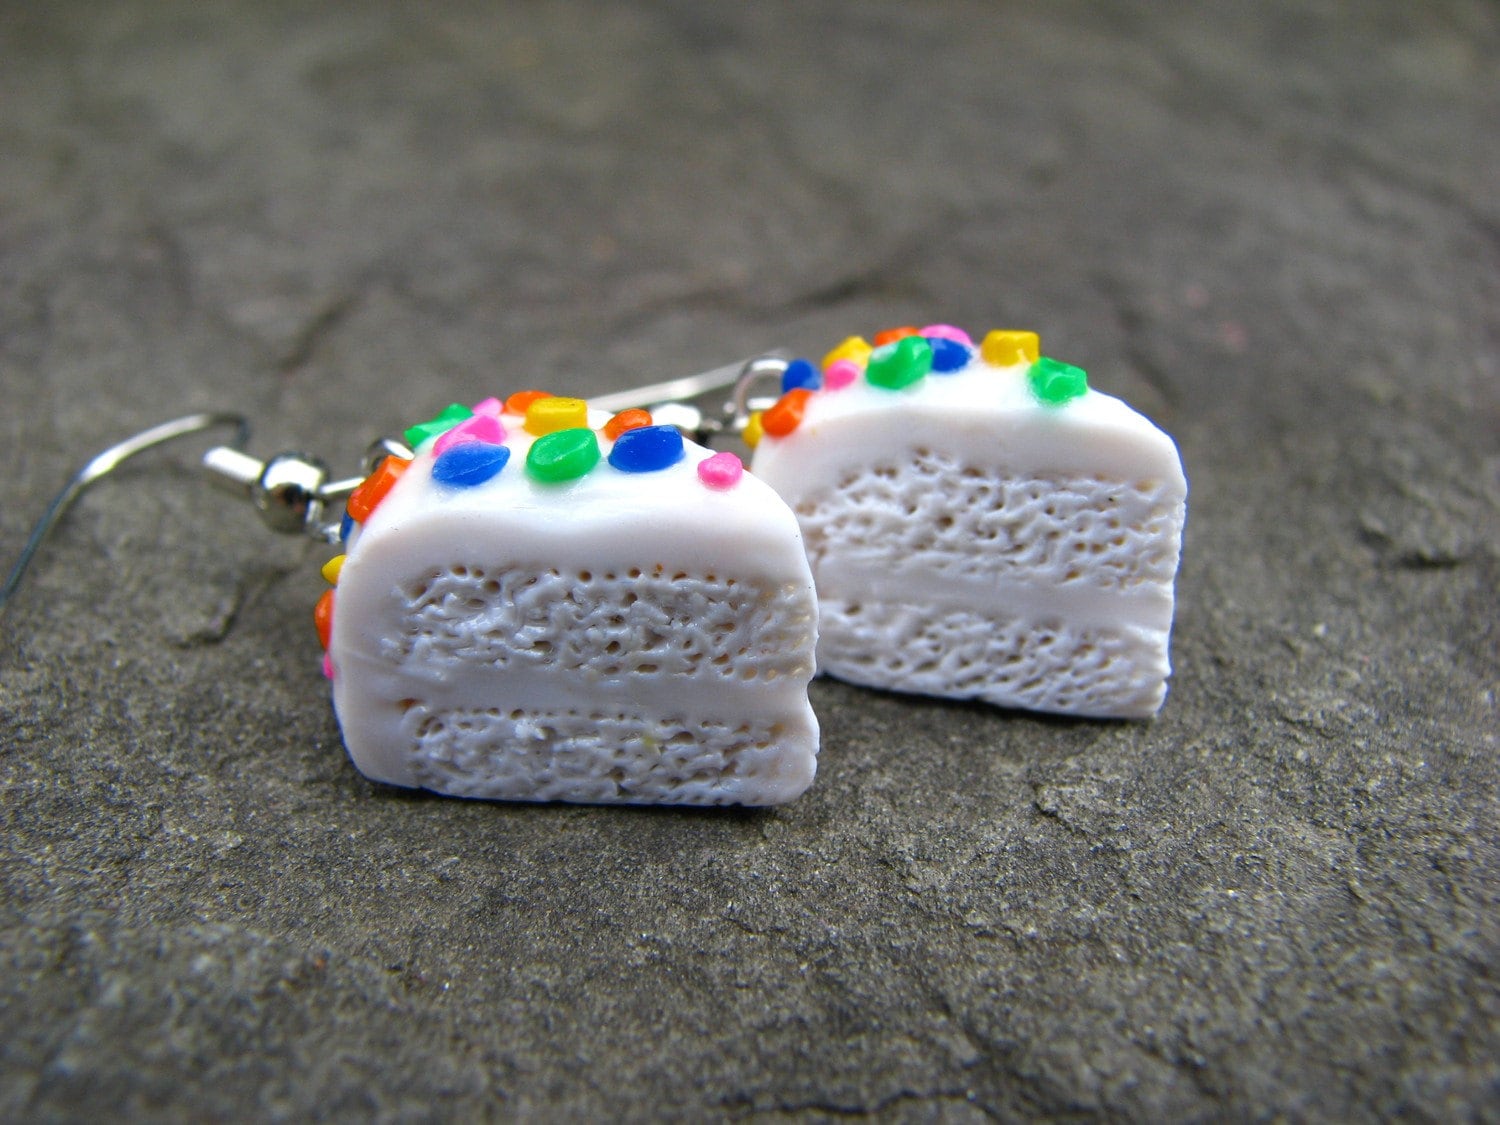
Birthday Cake Earrings

My goal for the next couple of days is to try and list an item a day to increase the views in my shop. I have sold a couple of items but I would love to sell a few more :D This is my listing for Saturday, following my plain white cake earrings. The difference?? These have sprinkles!!

They are currently listed for $7.00. Please check them out and I hope you like them!!

Also look out for these listings coming soon:
Pumpkin Pie
Cinnamon Rolls
S'mores
Cupcake
Brownie Bites
White Cake with Blue Sprinkles
and more!!!

Thanks for visiting my blog!

Red Velvet Cupcake Recipe


I thought that since my addiction is making food jewelry, I would also share with you some of my favorite real food recipes. This recipe is for Red Velvet Cupcakes, which I have used twice already. I have gotten so many good compliments from this recipe that I thought I would share it with you guys!! I hope you enjoy it:

Ingredients

Cupcakes:
  • 2 1/2 cups flour
  • 1/2 cup unsweetened cocoa powder
  • 1 teaspoon baking soda
  • 1/2 teaspoon salt
  • 1 cup butter, softened
  • 2 cups sugar
  • 4 eggs
  • 1 cup sour cream
  • 1/2 cup milk
  • 1 (1 ounce) red food color
  • 2 teaspoons Pure Vanilla Extract
  •  
  • Vanilla Cream Cheese Frosting:
  • 1 (8 ounce) package cream cheese, softened
  • 1/4 cup butter, softened
  • 2 tablespoons sour cream
  • 2 teaspoons Pure Vanilla Extract
  • 1 (16 ounce) box confectioners' sugar

Directions

  1. Preheat oven to 350 degrees F. Mix flour, cocoa powder, baking soda and salt in medium bowl. Set aside.
  2. Beat butter and sugar in large bowl with electric mixer on medium speed 5 minutes or until light and fluffy. Beat in eggs, one at a time. Mix in sour cream, milk, food color and vanilla. Gradually beat in flour mixture on low speed until just blended. Do not overbeat. Spoon batter into 30 paper-lined muffin cups, filling each cup 2/3 full.
  3. Bake 20 to 25 minutes or until toothpick inserted into cupcake comes out clean. Cool in pans on wire rack 5 minutes. Remove from pans; cool completely. Frost with Vanilla Cream Cheese Frosting.
  4. Vanilla Cream Cheese Frosting: Beat cream cheese, softened, butter, sour cream and Pure Vanilla Extract in large bowl until light and fluffy. Gradually beat in confectioners' sugar until smooth.

Polymer Clay 101: Baking Your Clay

Alright now this is probably one of the most important aspects of working with polymer clay (besides making sure your item looks good). I have to admit that I had so much trouble with baking my clay when I first started. I either burned the clay or it turned out rubbery and undercooked :(

When baking your projects I would suggest purchasing a toaster oven, although it should be fine baking in your normal oven I purchased a toaster oven just to be safe as the fumes from the clay if burned can be harmful. Also I have found that a toaster oven is much more convenient than using a full size oven each time. Toaster ovens, although not dirt cheap, shouldn't leave a hole in your pocket, since you don't need the top of the line toaster oven for the purpose of cooking your clay. If I recall right by toaster oven cost right around $30-$35 from amazon.com.

Second, when baking your clay always start at a LOW temperature, most of my clay suggests baking it at 275 F, but I just bake my clay at around 250 F for a little longer. Baking your clay at a lower temperature will allow you to cook it for longer without it burning. As well, some ovens bake at higher temperatures than others and that could cause you to burn your clay. You can always adjust your temperatures as you see how your oven bakes, but I will always suggest cooking at a lower temperature than your oven suggests first.

BE CAREFUL: Some colors of clay like red, white, blue etc. will cook faster than others, watch these colors so they don't change colors on your and get darker.

After baking your clay, let them cool before glazing them (this will help the glaze work better)

Have fun!!

Friday, February 18, 2011

New Listing!!

Finally got around to taking some pictures of my newest items today, and to list a new one:
White Cake Polymer Clay Earrings!
Check them out here:
They are currently selling in my etsy store for $6.00.

Soon to be listed items: White Cake with Sprinkles and Pumpkin Pie

Thanks for checking out my blog!


Tuesday, February 15, 2011

Polymer Clay 101: Starting Out with Clay

I thought I would write this post, because when I first started with polymer clay I was so lost and confused. I wanted to pass on some of the advice that I found out the hard way for anyone who is interested in polymer clay.

I would suggest purchasing a book with the basic techniques and materials, the first book that I ever bought (and still use today) was called The Polymer Clay Cookbook. Here is an amazon link:
This book is fantastic to help you get started, although it only shows you how to make mini food, I discovered tons of tips and techniques from this book.

Secondly, just get into it! Go out to your local craft store and pick up a few colors of polymer clay and just start experimenting! I think this is the best way to get started, although you may not like the first pieces you make just keep trying and don't give up :) The first mini foods I made didn't even look like food and I fell into the trap of giving up to easily and getting frustrated. Don't beat yourself down, try to just enjoy working with the clay. I know now I just have fun and I think my end product looks pretty good.

If you want to make jewelry from your polymer clay here are the starter materials that I suggest:
1) Eye Pins- so you can attach your finished pieces (you could also buy headpins but I have found eye pins to be soooo much easier to work with, although I would also suggest super glue to secure the eye pins into your clay after you bake it)
2) Pliers and wire cutters- to maneuver the wire and cut the wire to the right size
3) Depending on the kind of jewelry you want to make, purchase the jewelry findings (for example earring studs, dangle earrings, bracelet chain etc)

Keep in mind that these are just the basics I suggest. You don't need much to get started!! If you find that you enjoy working with clay, they are so many other items you can buy or find around your house to use. 

Get out there and have fun!!!!!!!
(Sorry about the picture, it isn't letting me turn it)

Monday, February 14, 2011

New Listing, please check it out!

I have just finished posting my newest listing for Lemon Meringue Pie Earrings

I am currently selling them for $6.50!

To make them I basically mixed some yellow and translucent clay for the yellow portion and topped that with plain white clay. Next I covered the pie in ecru clay for the crust and dusted it with orange chalk pastel. The whipped cream texture is from mixing some TLS with white chalk pastel and white clay until you get the consistency that you like. 

TIP: I plan out how I am going to cut up the whole pie before I add the TLS and place eye pins in each of the pieces. That way once you cut the pie up, you can just bake them instead of going through the frustrating process of trying to get the eye pins in.

LinkWithin

Related Posts Plugin for WordPress, Blogger...